Archive
Configure Putty & Firefox To Use SSH SOCKS Proxy Tunnel
On the previous posts I’ve talked about using SSH SOCKS Proxy Tunneling. But that was possible when you have a Linux or Unix OS running on your machine. What about the Windows lovers :p. No worries you’re on Windows!!! You still can do this. Things you need for this are:
1. PuTTY SSH Client.
2. Firefox Web Browser.
3. SSH access to a unix/linux server.
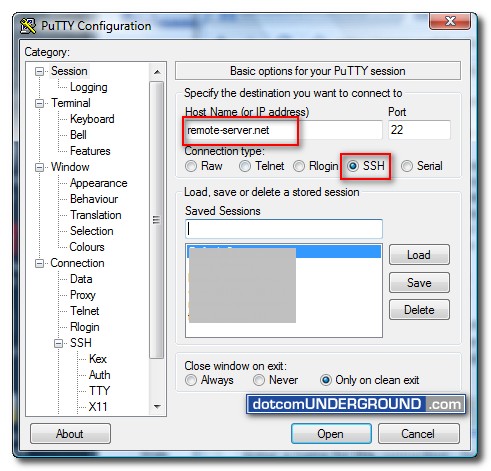
Now, first run PuTTY. You should be on the “PuTTY Configuration” window. On the “Host Name (or IP address)” field, type the hostname or IP address of your remote server. And select “Connection type” as “SSH“. The port should get automatically selected to 22.
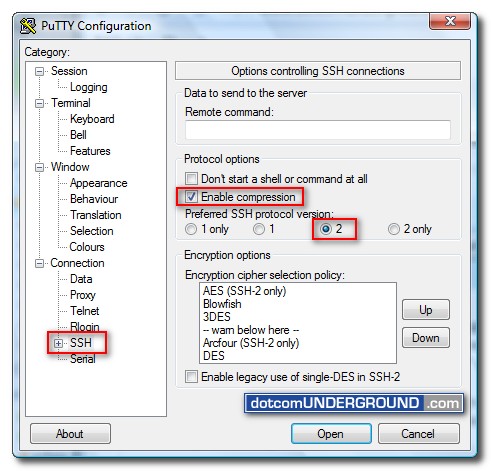
Then, in the left-hand menu, click on “SSH“. In “Protocol options“, tick “enable compression” and set your preferred SSH version to “2“.
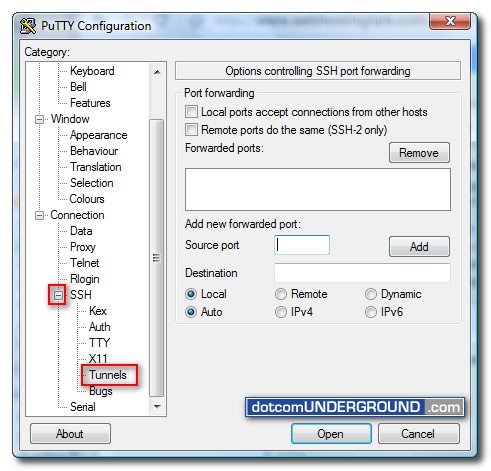
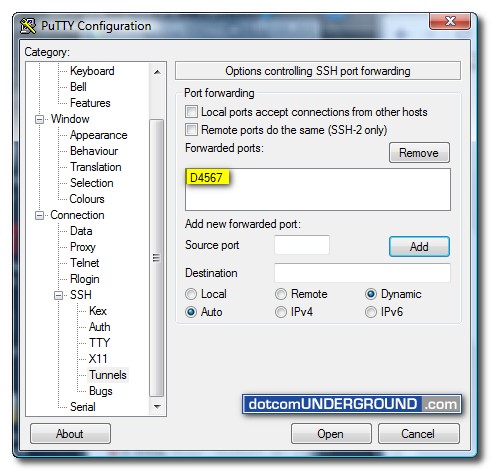
Now expand the “SSH” menu and select the “Tunnels” sub-menu.
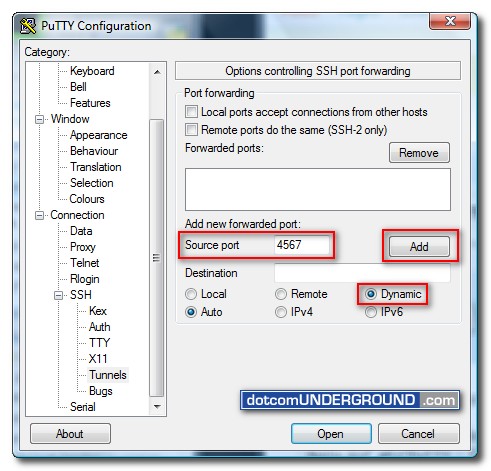
Now under the “Tunnels” menu (Options controlling SSH port forwarding), in the “Source port” field, type in a source port. Here I am using 4567. But you can use anything. Then select “Dynamic” as “Destination” and click the “Add” button.
After clicking the “Add” button the newly added forwarded port should get listed under “Forwarded ports” list.
Now, go back to the “Session” tab at the top of the menu, give the new connection a name (here i used My SSH Proxy) and click on the “Save” button.
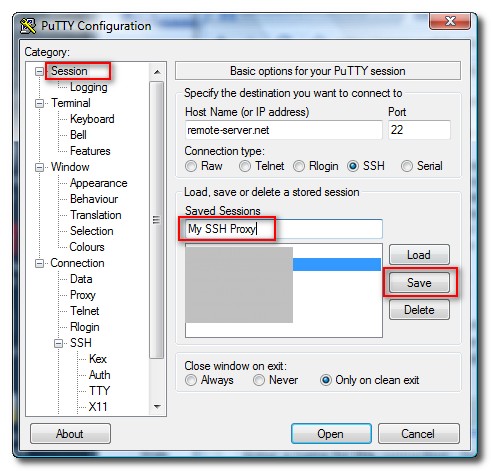
Congrats! we are done with the PuTTY configuration.
Now do the rest as same like previous posts. You’re done on using SOCKS Proxy Tunneling in Windows. 🙂
Tunnel DNS Lookups in SOCKS Proxy on Firefox
SSH SOCKS option is a great way to quickly tunnel web traffic. A word of caution for that is all DNS traffic is still in the clear. While the web traffic and URLs aren’t sniffable any more, curious people can still get a sense for what kinds of stuff you’re browsing, based on domain names. (And for the really really paranoid: if you’re on open wireless, your DNS lookups could get hijacked, causing you to browse to look-alike sites ready to phish your login credentials.)
Luckily, with SOCKS5 Firefox can control which side of the proxy handles DNS lookups. By default, it does the lookups locally resulting in the scenario above. To change this, set network.proxy.socks_remote_dns = true in about:config. This makes the SOCKS proxy more like a regular proxy, where DNS is handled by the remote end of the tunnel. Do the following for this:
- In the browser location bar (the place where you type web addresses), type about:config and press Enter. This opens a different set of Firefox preferences.
- Where it says ‘Filter:’ at the top, type network.proxy.socks. The list of preferences will automatically change to show your proxy preferences.
- Highlight ‘network.proxy.socks_remote_dns’ by clicking it only once. Then, right-click it. This opens a small pull-down menu. Select ‘Toggle’ from the menu to change its value to ‘true’. This adds privacy by preventing DNS queries from leaking. This is the reason why Firefox is recommended over other browsers for using this service.
- Close Firefox and restart it.
SSH SOCKS Proxy tunnel for secure web browsing
When you are at the coffee shop, or at a conference, and you are not sure that you want to send all your data over the wi-fi network in plaintext, you want a secure tunnel to browse. You can use the “-D” flag of openssh to create a SOCKS proxy.
SSH SOCKS proxy is one of the way to have a secure tunnel for web browsing. It’s comes handy when we need to do secure browsing in a public network such as in a public WiFi environment, as the traffic between our host and the proxy is encrypted .
For this to work, we need to have an SSH server somewhere that we want to tunnel our traffic to, and an SSH client at our host.
Creating an SSH SOCKS tunnel is as simple as running the following command;
$ ssh -D any-port-no-above-1024 user@proxy-address

e.g: $ ssh -D 8080 jamee@jaamee.com

This proxy address will be the SSH server address or ip.

The command assumes we have a user account with the username jamee at the server with the address jaamee.com, and 8080 is our local port to be used for the tunnel.
The next step is to configure our web browser to use the tunnel. Now all you have to do is set the preference in Firefox to use a SOCKS proxy. The proxy is, of course, “localhost”, with the port 8080. To do it in Firefox on Linux, choose Edit in the menu and click on Preferences (or Tools->Options in Windows). Then choose Advanced tab and click on the Network tab. Click the Settings button next to the Configure how Firefox connects to the internet text, and fill up the SOCKS proxy information as the following;

That’s just it, and from this point forward Firefox will tunnel all the browsing traffic through our SOCKS proxy, and the end server will see our traffic coming from our SOCKS proxy server. This can also be considered as a VPN as servers in our proxy server’s network can be accessed with their internal adresses.


